Figaro 2023FIGARO is the most comprehensive test- and support program ever developed to the Ericsson AXE system. The program benefits by a modern and user friendly Windows interface, easy to use also for inexperienced PC-users. It provides an integrated all-in-one environment with proficient tools and managers, inter-working with an advanced terminal emulator. Tools and managers can be customized according to your preferences and needs, enabling you to solve almost any test- and support job - rational and efficient. FIGARO can generate 98% of all commands required by a test- and support technician, making work with APZ, GSD, EMG and IOG, extension, conversion, migration or function change easy. There is no need to waste time finding parameters and examining fault codes. The risk of sending wrong commands or parameters is minimized, allowing you to deliver excellent work without disturbing subscribers and maintenance staff. Hot keys and shortcuts are using Element Management - WinFIOL and Microsoft Word layout, making program zapping easy. Log files and data transcripts (DT's) are named automatically, according to predefined rules, everywhere in the program, with logical and unique names, - saving your work and documentation for later use, with a minimum of effort. Figaro is designed to work with a widescreen resolution of 1920x1080 or higher. Lower screen resolution will hide certain fields and buttons, but using the splitters makes it possible to work with 1024x768 resolution, but it's not recommended. There are no specific requirements to CPU speed or memory, but working with a slow PC will extend processing time considerably, when you convert huge printouts. FIGARO offers a standard Windows user interface with drop down menus, customizable panels and a desktop area normally occupied by the main terminal. The menus gives access to all functions and managers. Hot keys and toolbars provides speed access to most used features. Most items can be customized concerning colors and fonts. Panels can be hidden if more desktop space is needed, but if visible, they give information about open files, current command etc. The hint panel gives useful hints and information about keyboard settings, date, time and terminal (I/O) From the Language drop down menu, you can
choose between nine major languages. The choice affects
serial transmission of national 8 bits ASCII-characters, by
translating them to an unused 7 bits character.
|
|||||||||||||||||||||||||||||||||
 Dropdown menu and speed buttons |
|||||||||||||||||||||||||||||||||
|
The terminal window holds up to 10.000 lines, and text search is optional. One or more lines can be marked as a block, which is subject of retransmission, printing, saving to file or input to "Alex" . Terminal contents can be saved on exit and reloaded on program start. Copy to clipboard as well as drag and drop of selected text to editors, makes it easy to use terminal contents in documents etc. Command EditorThe command panel, at the bottom of the
form, is the place where you do all work with manual typing
of commands. To make life easier, you can benefit of a lot
of sophisticated aids as for instance: Easy access to
save- and loadable command history list - holding up to 1000
commands. Seven sets of predefined - but customizable user
keys with automatic parameter setting. Automatic syntax
analysis of commands prior to execution with log file
option. If “>“ is appended to a command, the response will
be logged to a file named according to the expected filename
in Tobax, if the printout has to be regenerated or
examined. Syntax of log file name is [ Command_AXEname.log
]. Auto Lookup or incremental search in the command history
can by toggled by button. |
|||||||||||||||||||||||||||||||||
|
|
|||||||||||||||||||||||||||||||||
ConfigurationSelect protocol according to your target:
Use the radio buttons and checkboxes on
the Settings tab sheets, to set transmission parameters as
desired. Press the Default button to set all transmission
parameters to default position for each protocol, with one
mouse click. Now you only have to change settings, if your
current IOG session alters from 19200 baud – TTY session
alters from 4800 – MTU session from 1200 baud and IOIM
session from 300 baud. |
|||||||||||||||||||||||||||||||||
 Settings Tab |
|||||||||||||||||||||||||||||||||
|
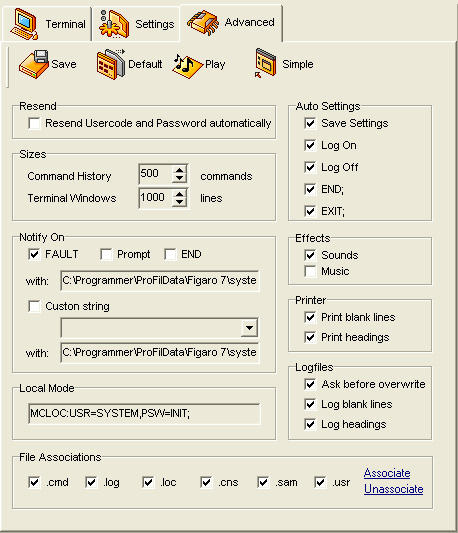
Having selected an asynchronous serial transmission protocol, go to the Terminal tabsheet and click the LogOn button to connect to AXE. You can force use of buffered or TTY transmission, using the BUF/TTY button above the command editor. (disabled if Ethernet protocol is selected) After selection of APG or TCP / IP protocol from the Protocol radio group, you have to set the port and IP address of the desired host, and connect your client socket to this host. Set port according to below table. If available, FIGARO is delivered with a complete database containing all host addresses in your LAN. The AXE field performs an incremental search in the database as you enter characters, and the host field is updated every time a matching host is found. Just press the Connect to label to open a TCP / IP session. The Terminal tab is brought topmost, and hopefully the AXE will answer with USERCODE, PASSWORD, DOMAIN and optional NVT request. When using port 5000 thru 5111 you can check the Connect Alarm Terminal checkbox to open the corresponding Alarm Terminal on a separate tabsheet, where all alarms from the connected AXE will be presented. If you want a special LogOn to AXE, (E. g. to CP-SB) change the port settings by selecting one of the available values from the combo box. The hint balloon on the Port field can help you to remember the offset.
Using APG or TCP/IP protocol you can swap between AXE nodes with only two mouse clicks. You can operate with multiple host databases, which is maintained easily using the Settings tab sheet | Host Handling options. Use the Hot labels to add or delete a host item. Click twice in the "New AXE" and "New IP" nodes to turn them into editors and type a name and an IP address. The changes can be saved manually pressing the Save button or automatically on exit, if Settings | Advanced | Auto Settings | Save Settings is turned on.
To connect to the Adjunct Processor Group (APG) using port
23, you have to disable your PC's automatic IP address
acquirement from a DHCP server, and fix your PC's IP address
within the APG network mask range. (Normally 192.168.200.4 -
254) Use mask 255.255.255.0 and connect to the upper
Ethernet slot in one of the APG nodes. Make a new APG host,
select APG protocol and port 23 before you establish the
session. |
|||||||||||||||||||||||||||||||||
AdvancedSettingsMost features can be customized according to your preferences. Detailed description is available for customers with access to online help.
|
|||||||||||||||||||||||||||||||||
 Advanced Settings Tab |
|||||||||||||||||||||||||||||||||
EditorFIGARO provides unlimited numbers of tabsheet editors, with direct access to
AXE port and useful formatting and modification options, designed to serve
any demand concerning AXE commands and printouts. The editors also provide
integrated transmit manager
features. |
|||||||||||||||||||||||||||||||||
 |
|||||||||||||||||||||||||||||||||
 Figaro Tab Sheet Editor |
|||||||||||||||||||||||||||||||||
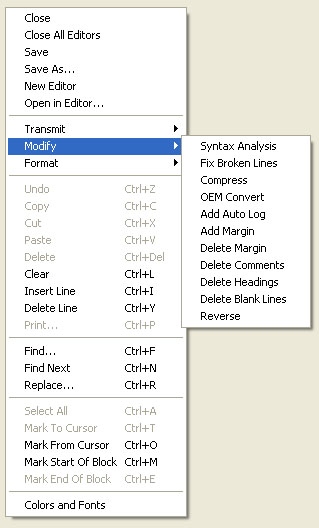 Editor Pop Up Menu |
|||||||||||||||||||||||||||||||||
Transmit Manager |
|||||||||||||||||||||||||||||||||
|
The Transmit Panel becomes visible, when multiple lines are transmitted from any Editor or Clax list. The MML commands are iterated and the command in turn is highlighted. The editor automatically scrolls to keep the highlighted region visible. When transmission is performed line by line, (F8) the manager automatically find and highlight the next valid MML command. The manager calculate estimated finish time and number of commands transmitted per minute and commands rejected with NOT ACCEPTED or FUNCTION BUSY are summarized. It's recommended to use the unique NOT ACCEPTED tool to collect the rejected commands during transmission for further investigation or retransmission. Transmission is controlled by use of speed buttons
located above the tabsheets, and a pressed button will affect the
transmission regardless of which tab is topmost. Most used buttons are
associated with a shortcut. (See detailed button
description) It's possible to work with other editors and managers
during transmission with certain exceptions. |
|||||||||||||||||||||||||||||||||
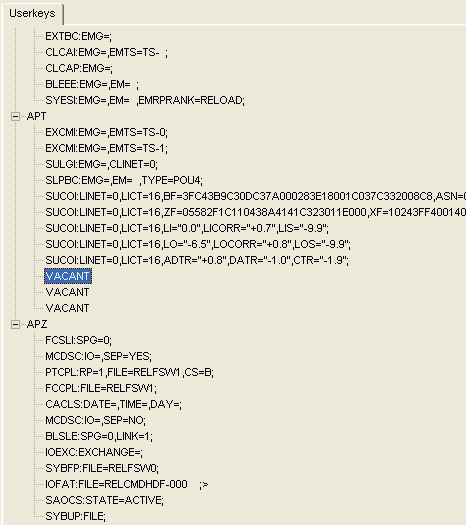
UserkeysFIGARO supports seven sets of userkeys with fast access from a dropdown menu, available from the userkey icon above the command editor. Each set has a maximum of 12 commands with corresponding hotkeys Ctrl-F1..Ctrl-F12, when the command editor has focus. The commands are also visible and selectable from the combo box attached to the command editor (rightmost arrow). The selected set will remain active next time you start FIGARO. Available sets are: EMG, APT, APZ, IOG, BGS, Define and Custom. The Userkeys tab sheet is opened by clicking the icon or the Options menu item, and allows you to edit any command and Save all sets to the file FIGARO.KEY, from where they are loaded on program start. To edit a command, simply click it slowly twice to transform the node into an editor, perform the edit and press Enter to finalize the operation. Parameter values can be left empty and FIGARO will insert the last used value at runtime. For time related parameters, the inserted value is read from PC clock. Valid for DATE, TIME, DAY, RP, EMG, MACCG, SNT, DIP, SDIP, IO, NODE, POS, BG, BSNB and EXCHANGE parameters.
Associated File TypesBy associating file types with Figaro 7 you obtain full integration with Windows API allowing you to open all associated file types from Explorer and File Manager.
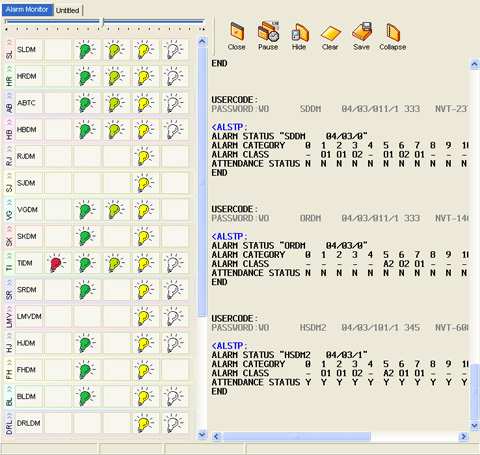
Alarm ManagementThe alarm Terminal is opened from the Settings tabsheet by checking the Connect Alarm Terminal checkbox before a connection to an AXE is made. The Alarm Terminal is located on a separate tabsheet and buttons and keys are similar to the Main Terminal. The Alarm Terminal is read only, meaning that you can't LogOn and send commands to the terminal, but only receive alarms, ERROR INTERRUPT, RESTART DATA etc. from the AXE. The Alarm Terminal uses the same IP address as the Main Terminal, but the Port Offset is automatically modified to receive alarm printouts. The terminal can be configured to give acoustical alert every time an alarm of matching alarm class is output to the Alarm Terminal. Visual alerts are given on the alarm display located topmost in the main terminal. The display consists of five colored panels which are updated every time a ALARM STATUS printout is output. A heart beat counter is incremented on every heart beat and A1 alarm is issued if interval is exceeded. When an alarm status printout is received, the active Alarm Classes is visually presented on the Alarm Panels, giving the user an immediate information about the actual alarm status. (A1, A2, A3, O1 and O2) Panel is visible both on the main terminal and the alarm terminal. A click on a panel will send an ALLIP:ACL=xx; to the connected AXE, and the ALARM LIST information is presented on the main terminal. Figaro offers an unique integrated monitor, that continuously scans the alarm status of the defined hosts:
The monitor starts automatically, when the tabsheet opens, and the scan interval is set to 5 seconds for first scan increasing to 30 seconds for the following. If one or more hosts reports an A1 alarm, the tab turns highlighted to alert the user if the tab is not topmost. A click on a lighting bulb will send an ALLIP:ACL=xx; to the reporting host. A click on the host name will open the Virtual Alarm Printer tabsheet:
The Virtual Alarm Printer is a genuine web browser with a combo box for quick selection of host to visualize. The address line can hold any URL turning the manager into a powerful Internet browser with support of both java scripts and flash objects. Status PanelThe Status panel gives information about active files and commands. The panel can be enabled/disabled from the Window Menu.
Hint Panel
The hint panel gives useful hints and information about keyboard settings, date, time and terminal (I/O) Color and Font SettingsFigaro now fully support Windows Themes and Styles. From the Colors and Fonts tabsheet, simply select a style and click the "Set Style" label. The "Colors and Fonts" tabsheet is activated from the "Options" dropdown menu or the "Speed Button" above the Command Editor. Terminal and Editor colors and font can be customized, if the selected style default color does not fit. |